STILETTO® has been designed and engineered to be easily trailered. Numerous innovations on the boat and trailer carry out this concept. As a result, two people can set up STILETTO® from the trailering to sailing configuration in approximately one hour, once the routine has been learned. The addition of one or two more people makes the procedure even faster and easier. A nice thing about setting up a STILETTO® is that she never fails to draw a crowd, so volunteer help is usually available if you are shorthanded.
The following procedure will assure a fast, easy, and safe launching or recovery. We suggest that you familiarize yourself with the sequence by reading through these instructions before beginning your first set up.
CAUTION
Be sure to choose a safe launching site. The ramp and set up area MUST BE FREE OF OVERHEAD POWER LINES and tree limbs. The ramp needs to be at least 15 feet wide.
The STILETTO® mast is 36 feet long. When sailing, the mast is about 40 feet off the water. When on the trailer it is about 43 feet high. ALWAYS ALLOW AMPLE CLEARANCE AROUND POWER LINES!
12 Steps
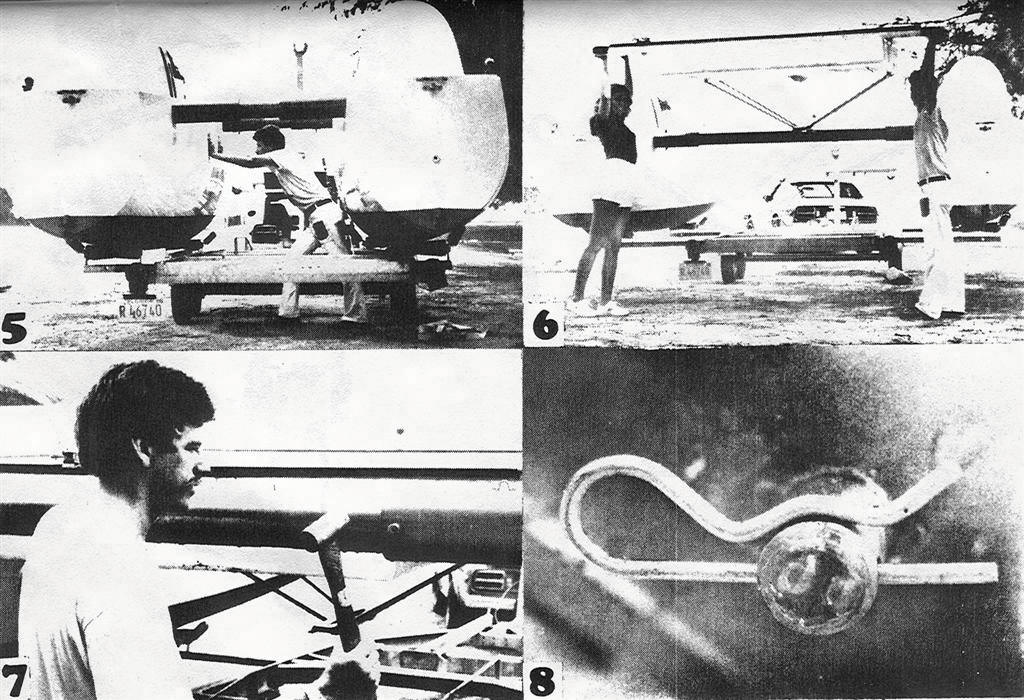
Remove mast from trailer stanchions and place it on the ground behind the boat. (Photo 2) Remove all tie-down straps. Remove bridgedeck from fore decks. (Photo 3) Disconnect winch cable from over the forward torsion tube, remove aft mast stanchion from trailer and push boat aft on trailer approximately 12 inches to clear bow chocks as the boat is expanded. Expand one hull at a time by pulling the 2 spring loaded release pins on one side of the trailer (Photo 4) and pushing outward from a position midway between the torsion tubes, as shown in photo 5.
STEP 1
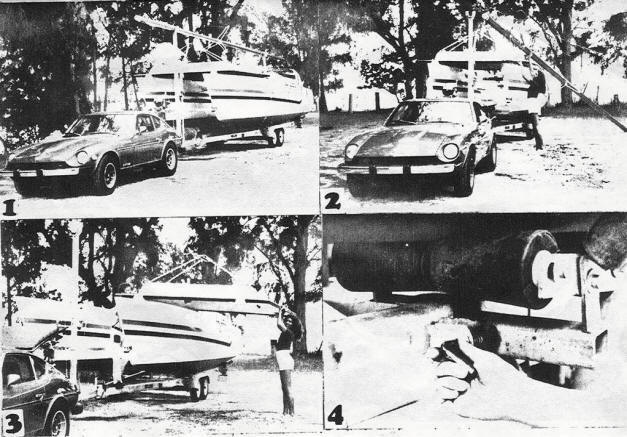
Pull the release pin as far as possible and cock it to one side so it will stay in the released position until you have telescoped the boat slightly. Then put the pins back in their normal position so they will spring into place when the arm is at its correct expanded position. Insert the vertical taper pins into the tapered holes furthest outboard on the torsion tubes of the expanded hull. The forward vertical pins (which also secure the dolphin striker) are grooved at the small end of the pin. With one hull expanded and secured by the vertical taper pins, follow the same procedure for the other hull.
STEP 2
Place the bridgedeck into position by carrying it over the aft torsion tube and resting on its supports between the torsion tubes. (Photo 6) Insert the 4 horizontal taper pins making certain that they pass through the bridgedeck and hold down brackets on the underside of the bridgedeck. Seat in all taper pins by pounding them firmly with a brass mallet. (Photo 7) Insert hitch pin clips into the taper pins. (Photo 8)
CAUTION
Check all taper pins periodically to insure that they remain seated in their proper position; particularly during the first several times the boat is sailed. Put a coating of grease on the pins before inserting to help prevent corrosion of the aluminum torque tube around the pins which cause sticking of the pins with time. (It would be wise to remove and re-grease the pins at 6-month intervals.) Always use a brass mallet when seating in or removing taper pins. We recommend a 2 lb. mallet. Use of steel hammer will result in deformation of the taper pin which will hamper its removal.
STEP 3
Now is a convenient time to unload all the rigging and gear for inside the hulls.
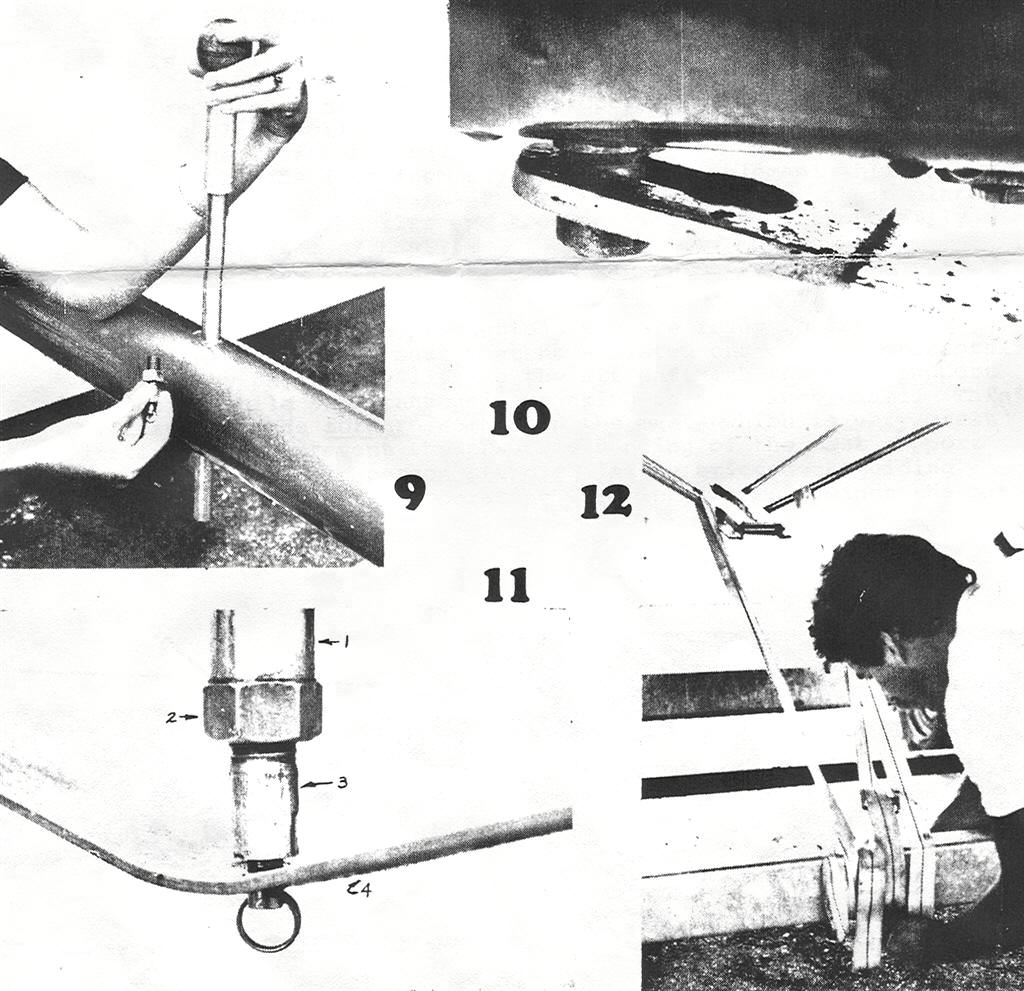
Install dolphin striker by removing the adjuster on the strut and inserting the strut into the hole in the center of the main beam. (Photo 9) Be certain that the spacer remains in position between the mast support ball and the main beam. Slide the outboard ends of the dolphin striker strap into position on the dolphin striker taper pins. (Photo 10)
After screwing the adjuster back into the strut, remove the keeper ring and insert the end of the adjuster into the hole in the dolphin striker strap. (Photo 11) Replace keeper ring. Adjustment of the dolphin striker takes place later in the sequence.
CAUTION
The next step is to raise the mast, but before doing so it is necessary to secure the boat to the trailer in such a manner that the boat cannot slide forward. Securing a line or hold down strap between the daggerboard support bracket and an aft cross member on the trailer frame as shown in photo 12 will restrain the tendency of the boat to move forward brought about by raising or lowering the mast. Attach shrouds and forestay to mast hound using the shackle provided. Be certain the forestay is in the middle between the two shrouds. The head of all shackle pins should be pointed away from the mast as in photo 13 to prevent them from scarring the mast. After securely tightening, be sure that all four shackles are safety wired.
STEP 4
Attach the topping lift at the top of mast to the pin that separates the main halyard sheave cheek plates and tie off the other end temporarily to the mast rotator or anything convenient at the bottom of the mast. Step mast base onto the mast support ball and support aft end of mast with the rear mast stanchion off the trailer at a point about 15-20 feet behind the boat. Do not allow mast to slide aft off the mast support ball at this point or scratching the bridgedeck may result.
Angling the stanchion toward the mast base will help keep the mast step safely on the support ball. Secure lower shroud shackles to chain plates and pass the shrouds over the canopies and insure that the shrouds will not get caught on anything while raising the mast. Raise the gin pole on the trailer to the vertical position and attach o-ring in forestay bridle to aft side of gin pole. Use several wraps of heavy line tied securely as the stain here is great. (Photo 14) Attach a winch cable to forward side of gin pole.

CAUTION
Before proceeding to raise mast check the following:
ARE THERE OVERHEAD WIRES OR TREE LIMBS IN THE VICINITY?
ALLOW A MINIMUM OF 50 FEET CLEARANCE IN ALL DIRECTIONS.
- Is the line or strap restraining boat from moving forward on trailer attached?
- Are shrouds and forestay in proper alignment at hound?
- Are all shackles properly aligned- not twisted? Are they safety wired?
- Are shrouds free from any possible entanglements while mast is being raised? Are they attached at chain plates?
- Are halyard shackles and topping lift secured temporarily at bottom of mast?
- Is the line between o-ring and gin pole secure?
- Is the ratchet securely engaged on the trailer winch?
STEP 5
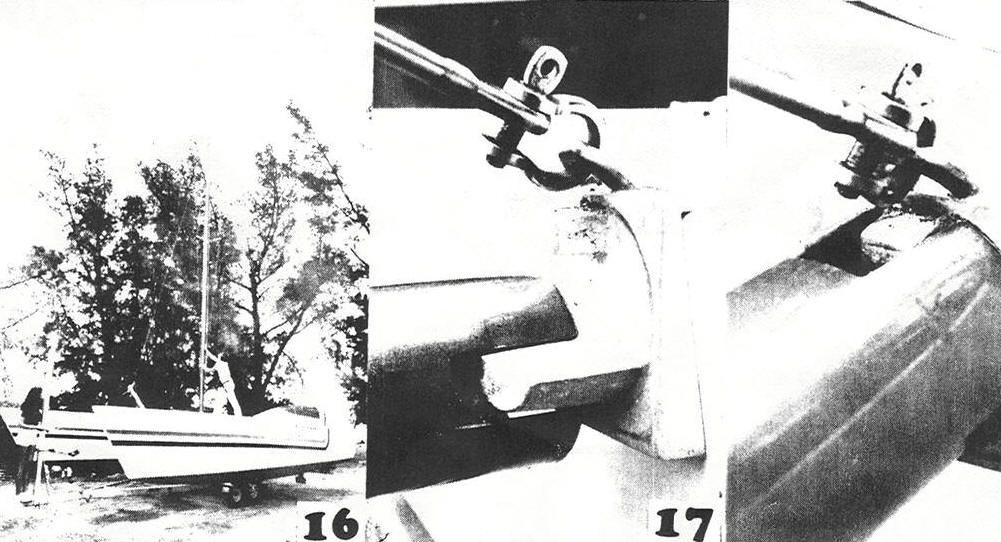
After taking the above precautions you are ready to raise the mast. IMPORTANT: The mast must be assisted out of the horizontal position by physically lifting the aft end with the mast support stanchion while simultaneously cranking in the winch cable. This will relieve the forward strain on the mast—which is very great initially—and prevent the possible bending of the mast support rod. Then with one person standing in the bridgedeck guiding the mast and one person operating the winch, simply winch the mast up to its vertical position. (Photos 15 & 16)
Attach forestay bridle to chain plates with the shackles provided. You may have to extend the forestay turnbuckle to accomplish this. Make sure the ring in the bridle is on the aft side of the toggle. Once the bridle is attached you may release the gin pole.
STEP 6
Install the compression tube with the port side (end without notch) of the compression tube socket, slid the starboard side on to the lower flange as shown in phot1 17 and rotate the compression tube 90 degrees. Slide the tube straight up, over the top flange (Photo 18) then rotate the compression tube 180 degrees so that the cut-out on the tube points straight down. You will probably have to force the hulls apart slightly to get the compression tube started on the socket. Tighten the headstay until the rig is snug. The standing rigging should always be kept tight; the mast should be relatively plumb. (After sailing a while you may need to move the shrouds down a notch in the adjusters to compensate for wire stretch.) Now is a good time to adjust the dolphin striker.
The purpose of the dolphin striker is to accept some of the compression loading from the mast and transfer that load back to the outboard ends of the main beam. The dolphin striker is essentially superfluous except under the most severe conditions of high winds and seas and heavily laden boat. Therefore, the dolphin striker should be adjusted to where it is snug while the boat is static. Starting with the dolphin striker adjuster screw (#3 in photo) in full up position, back the adjuster screw out (turn counterclockwise) until the adjuster is snug against strap (#4).
Then simply tighten the lock nut (#2) against the dolphin striker rod (#1) to secure the adjuster in its proper position. You may need to readjust the dolphin striker from time to time to maintain the proper tension.
STEP 7
To install the trampoline, first slid the rear edge of each half into the track on the bridgedeck. The rear edge and outboard sides have bolt rope sewn into the edge. The front edge and center edges have grommets for lacing.
Next slide the outboard edges into the tracks on the hulls. If you encounter difficulty in getting the trampoline started into the track, you open the end of the track slightly by inserting a round shaft (such as a Phillips screwdriver) into the end of the track and prying it open. Do this carefully!
STEP 8
Once the tramp is in the tracks, begin lacing. The longer of the two laces lines is for lacing the front of the tramp after it has been passed over and around the front compression tube. At first the lace lines won’t seem long enough; but as the trampoline is tightened you will find you have just enough without long unsightly ends.
Notice that the grommets are offset so that lacing can be done in a zigzag pattern. The best method we’ve found is to loosely lace the center and front first—then come back and tighten things up. This way you will work all of the wrinkles out. The front lacing should not be so tight that it pulls the compression tube out of column. If your boat has an electrical system, fasten the hull to hull wires to the Velcro straps on the underside of the trampoline.
When completed your safety net installation should appear as in photo 19. You will probably find it necessary to retighten the lace lines another time as everything stretches a little the first few times you use the safety net.
CAUTION
During this lacing most people are preoccupied with the trampoline and walk into the greased arms of the trailer or pull tramp lines through the grease.
STEP 9
Install the outboard motor bracket by positioning it over mounting holes in the center of the aft torsion tube and dropping in the stainless steel quick pins as shown in photo 20. Be sure to insert the hitch pins (safety pins) into the bottom of the quick pins. Your motor can now be mounted on the bracket—be sure to tilt the motor up for launching.
Install the rudders by dropping the pintles into the gudgeons. Note that there is a port rudder and starboard rudder as indicated by tiller angle. When properly installed, both tillers will point in toward the mast. Be sure to insert the clevis pin into the pintle pin once the rudder is in position. This will prevent the pintles from accidentally coming out of the gudgeons.
Install the tiller cross arm by attaching it to the tiller ends with the clevis pins. The tiller extension should be on the side of the cross arm facing up and forward.
STEP 10
Install boom by dropping 1/4 inch bolt into the gooseneck fitting and tightening the self-locking nut. Do not over tighten this bolt- the gooseneck must swivel freely. Attach topping lift to hole in the casting at outboard end of boom. Attach mast rotator line between shackle on mast rotator and eyestrap on boom and adjust line so that the mast can rotate approximately 30-40 degrees out of alignment with the boom.
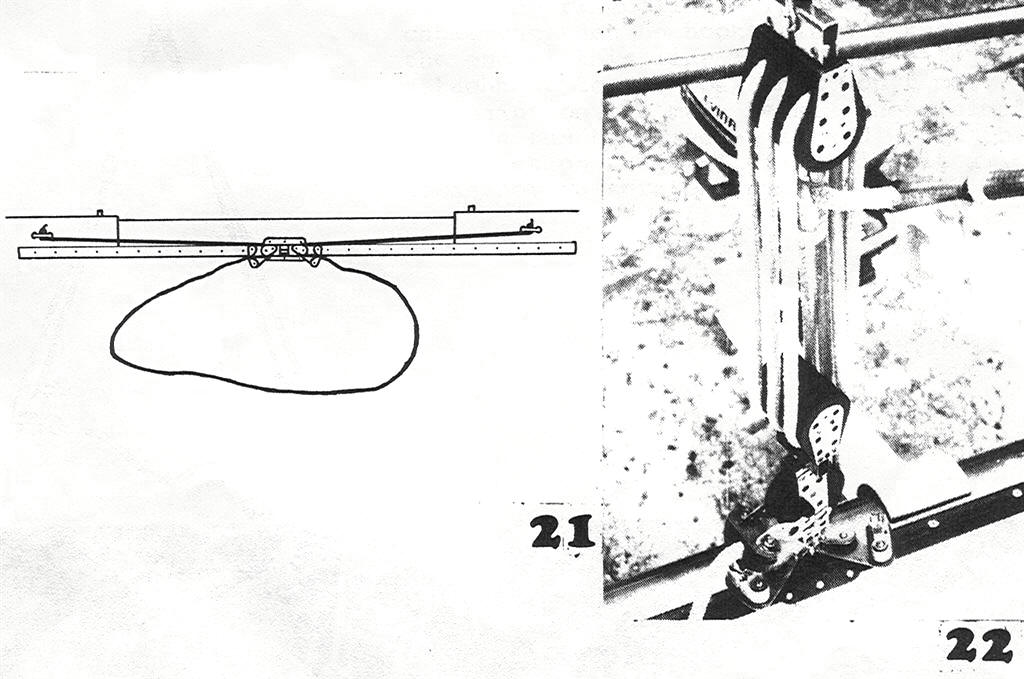
Install traveler by removing an end-stop and cheek block on the traveler track and sliding traveler car onto the track. Replace end-stop and cheek block and reeve traveler line according to diagram 21.
Install mainsheet by shackling the triple block to the pigtail at the outboard end of boom. Shackle ratchet block to traveler car and reeve mainsheet between the two as in photo 22.
STEP 11
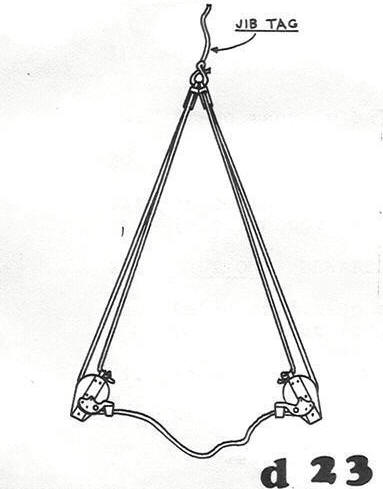
Install jib sheets by attaching jib blocks with stand up spring to jib car. Then tie the two bullet blocks to the jib tag line with a bowline. Temporarily tie the other end of the jib tag line to the o-ring in the headstay bridle.
Thread the continuous jib sheet according to diagram 23 by tying off at becket on one jib block, then over through the other jib block, up to the other bullet block and back to the becket.
Attach optional reacher bridle by shackling it to the forward most padeyes. The reacher tack adjustment lines attach under the drum of the roller-furler (or to the snap shackle if you don’t have furling gear) and lead through the blocks at the outboard ends of the bridle, aft along the sheer to the cam cleat with bullseye on deck near the forward corners of the bridgedeck. The reacher sheets are lead from the clew aft (passing outside the shrouds) to the stand up blocks on deck, then in-board to the cam cleats near the forward corners of the bridgedeck.
The optional Genoa bridle attaches by either lacing or shackling it between the padeyes at the base of the forestay bridle.
STEP 12
The Cunningham (downhaul) is reeved by tying one end to the eyestrap on the mast, passing it up through the tack grommet in the main, down through the cheek block located under the mast rotator, up through the tack grommet again and down to the clam cleat on the other side of mast. The tack pin at the gooseneck is superfluous and is not meant to hold the tack of the main. With daggerboard and sails lying in the forward safety net STILETTO is now ready for launching.
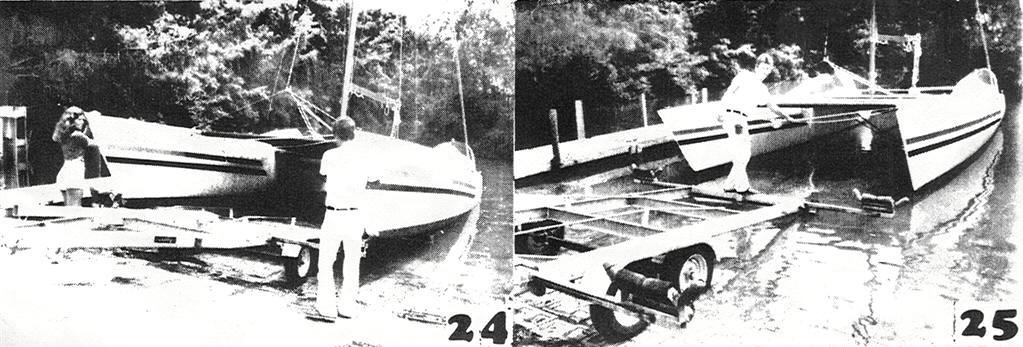
Drive slowly and carefully to launch ramp being cautious of overhead wires and obstructions. A line or the winch cable should be secured between boat and trailer to prevent the boat from rolling off the trailer prematurely. You may or may not want to tilt the trailer, depending on the angle of the ramp. Simply back the trailer in until the aft trailer wheels touch the water and guide the boat off, keeping it in alignment with the trailer to avoid scratching the boat on the trailer. (Photos 24 & 25)
When recovering the boat a stout line should be tied to the main beam (not to the dolphin striker rod) and run forward under the trampoline. The trailer winch cable can then be hooked into a knot at the end of this line insuring a safe attachment to the boat that won’t mar the paint on the main beam. Then, simply release the tilt mechanism and winch the boat back as not to scratch anything.
More Assembly Instructions
Basic Assembly | Assembly Check List | Tuning Manual | Jiffy Reefing | Mast Rotator | Genoa Instructions | Trampoline Installation | Mainsail Traveller Control | Roller Furler Installation and Use | Installing Deck Snaps on Cockpit Tent | Reacher Running Rigging Installation